
BigCommerce Install Instructions: Stencil Theme
Congratulations on installing Spresso!
You’re almost ready to get started! Now that you’ve installed Spresso’s BigCommerce App, you have to make only a few small tweaks to your theme to ensure our AI-generated pricing is displayed on your site.
At a high level - you will be replacing the static prices from your BigCommerce catalog with placeholders that help Spresso’s technology determine the right price for each item. NOTE: Spresso will not work without these changes.
If you have any questions or concerns about this process, don’t hesitate to reach out to us at [email protected] - our team of BigCommerce experts will gladly assist you with any issues you may have.
If you have a theme that's not based on Stencil, or you use BigCommerce in headless mode please reach out to us at [email protected].
Average time of completion is 3 days.
1. Modify Price.html displays:
Modify how your BigCommerce storefront displays prices by editing the price.html file.
1a. Non Sale Prices Without Tax
These instructions are for displaying non-sale prices without tax.
If you need to display RRP, or prices with tax, reach out to us and we can send you the exact HTML change needed for your pricing scenario.
In price.html, found inside templates/components/products in your BigCommerce theme.
Where the file says:
<span data-product-price-without-tax class="price price--withoutTax{{#if price.with_tax}} price-section--minor{{/if}}">{{price.without_tax.formatted}}</span>Remove the line above and replace it with the Spresso-enabled price HTML below:
Once you’re done, click Save File.
<span
data-product-price-without-tax
class="price price--withoutTax{{#if price.with_tax}} price-section--minor{{/if}} price--main"
data-spresso-pricing-display="min"
data-spresso-item-type="product-id"
{{#if spressocxt "===" "pdp"}}
data-spresso-price-context="pdp"
{{/if}}
{{#if product }}
data-spresso-item-id="{{product.id}}"
data-spresso-fallback-id="{{product.id}}"
{{#any product.options state="modifier"}}
data-spresso-default-pricing
{{/any}}
{{#or (if product.bulk_discount_rates.length '>' "0") price.non_sale_price_without_tax settings.request.is_crawler}}
data-spresso-default-pricing
{{/or}}
{{#unless product.can_purchase}}
data-spresso-oos
{{/unless}}
{{else}}
data-spresso-item-id="{{this.id}}"
data-spresso-fallback-id="{{this.id}}"
{{/if}}
>
{{#or (if product.bulk_discount_rates.length '>' "0") price.non_sale_price_without_tax settings.request.is_crawler}}
{{price.without_tax.formatted}}
{{else}}
{{#any product.options state="modifier"}}
{{price.without_tax.formatted}}
{{else}}
{{/any}}
{{/or}}
</span>1b. Provide context to our system:
In the same file,price.html.
Near the top of the file, where the file says:
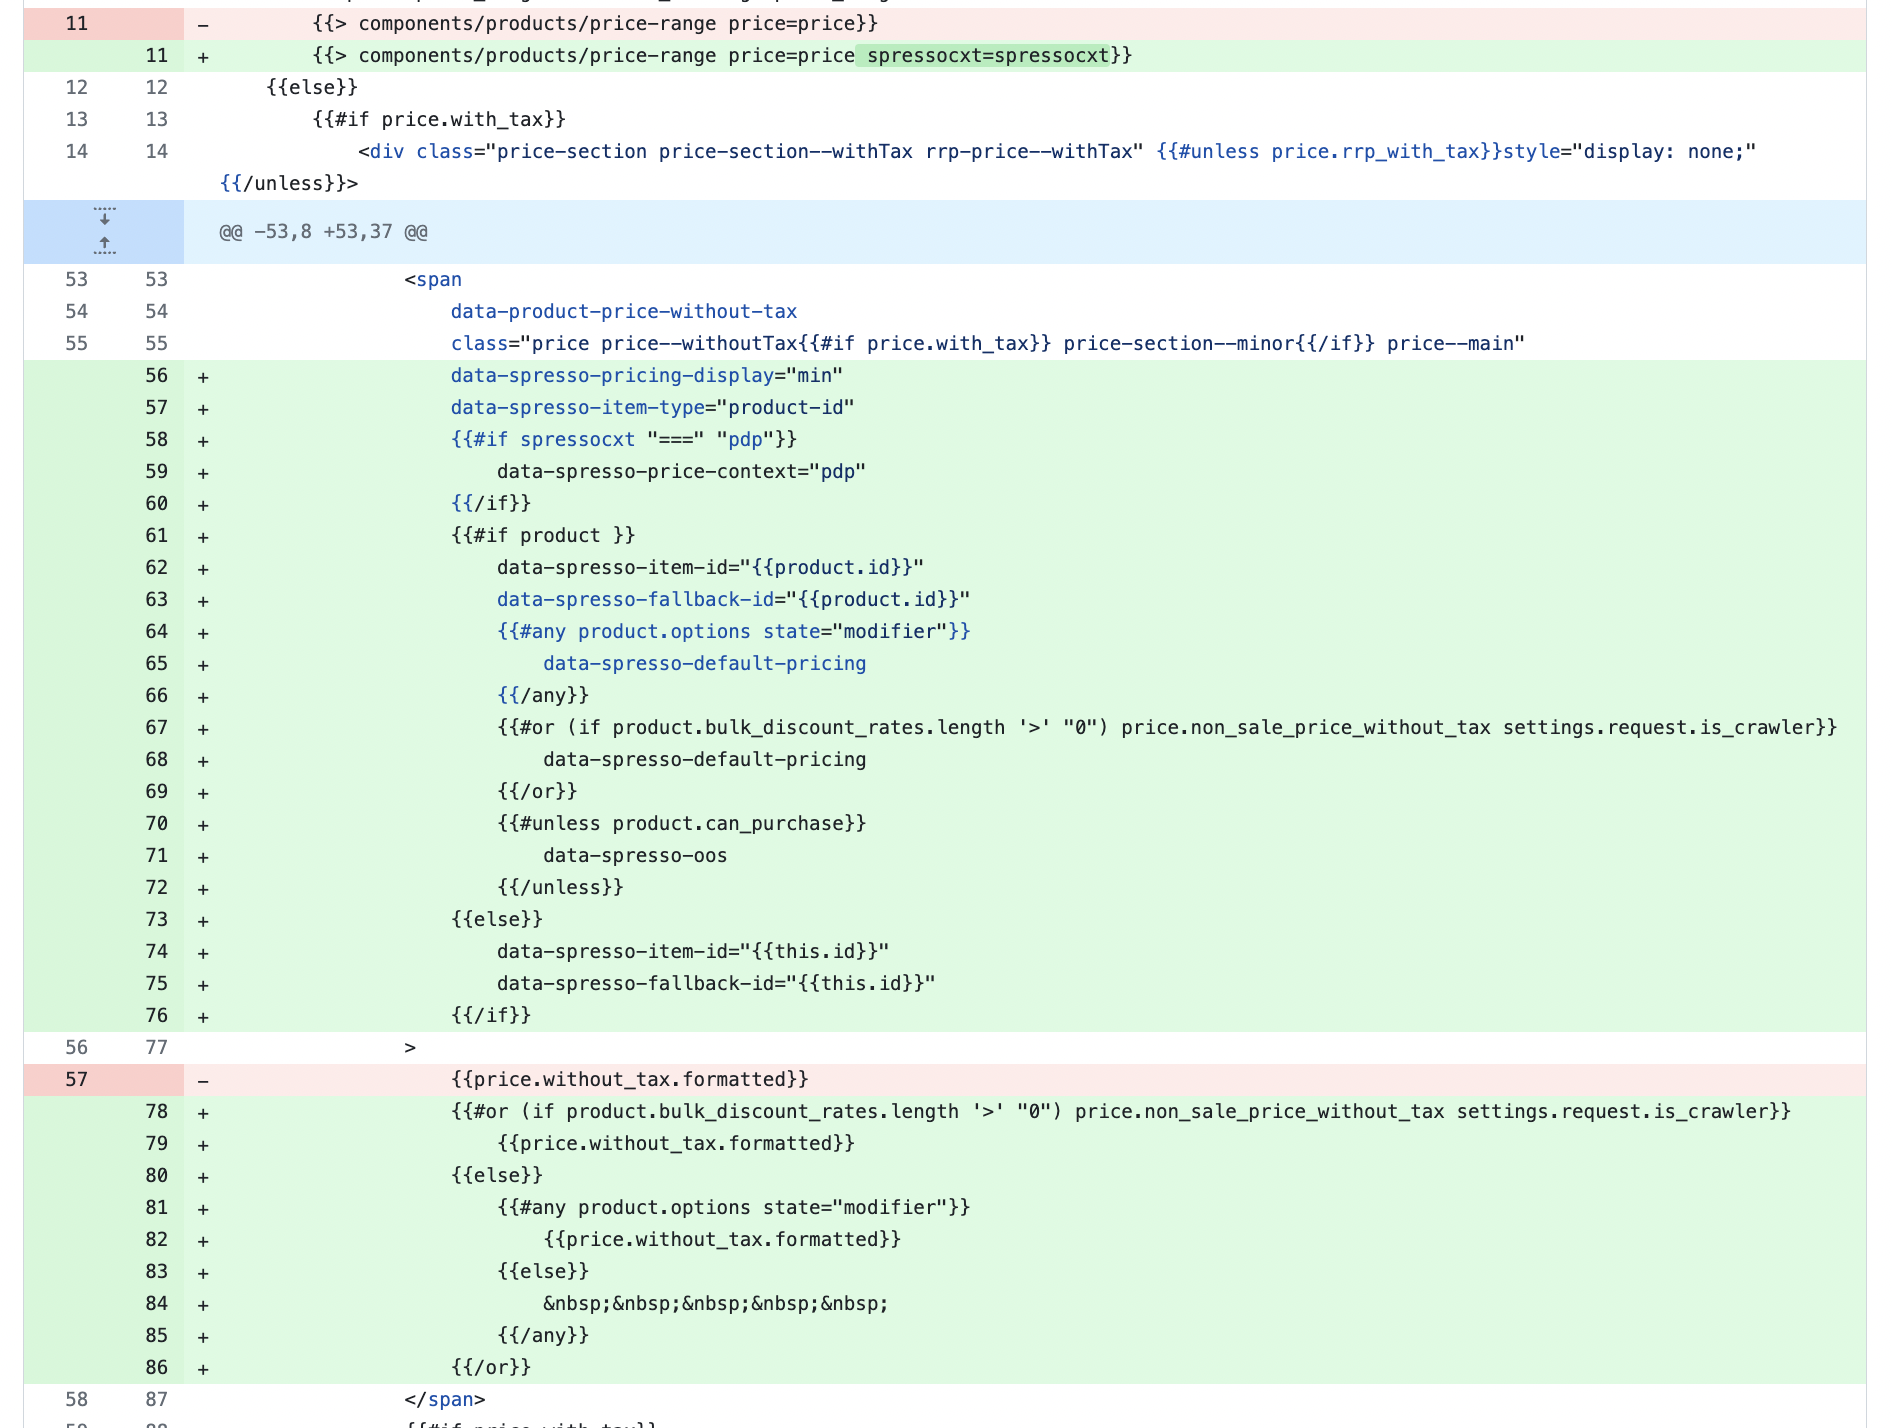
{{> components/products/price-range price=price}}
Remove the line above and replace it with the Spresso HTML below:
{{> components/products/price-range price=price spressocxt=spressocxt}}The image below shows the entirety of the changes to this file, lines in green have been added or edited and lines in red have been removed.
2. Modify Price Range displays:
We also have to modify how products with a “range” of prices are displayed. If your config.json file has price_ranges set to false you can skip this step.
In price-range.html, also found inside templates/components/products
Where the file says:
<span data-product-price-without-tax class="price price--withoutTax">{{price.price_range.min.without_tax.formatted}} - {{price.price_range.max.without_tax.formatted}}</span>Remove the line above and replace it with the Spresso-enabled price HTML below:
Once you’re done, click Save File.
<span
data-product-price-without-tax
class="price price--withoutTax price--main"
data-spresso-pricing-display="range"
data-spresso-item-type="product-id"
{{#if spressocxt "===" "pdp"}}
data-spresso-price-context="pdp"
{{/if}}
{{#if product }}
data-spresso-item-id="{{product.id}}"
data-spresso-fallback-id="{{product.id}}"
{{#any product.options state="modifier"}}
data-spresso-default-pricing
{{/any}}
{{#or (if product.bulk_discount_rates.length '>' "0") price.non_sale_price_without_tax settings.request.is_crawler}}
data-spresso-default-pricing
{{/or}}
{{#unless product.can_purchase}}
data-spresso-oos
{{/unless}}
{{else}}
data-spresso-item-id="{{this.id}}"
data-spresso-fallback-id="{{this.id}}"
{{/if}}
>
{{#or (if product.bulk_discount_rates.length '>' "0") price.non_sale_price_without_tax settings.request.is_crawler}}
{{price.price_range.min.without_tax.formatted}} - {{price.price_range.max.without_tax.formatted}}
{{else}}
{{#any product.options state="modifier"}}
{{price.price_range.min.without_tax.formatted}} - {{price.price_range.max.without_tax.formatted}}
{{else}}
{{/any}}
{{/or}}
</span>3. Add Spresso Context on PDP pages:
In templates/components/products/product-view.html
Toward the middle of the file, find the line:
{{> components/products/price price=product.price}}
And replace it with the following block of code:
{{> components/products/price price=product.price spressocxt="pdp"}}4. Ensure Spresso is notified when a variant changes:
Determine whether your theme uses product-details.js or product-details-base.js - both are located in assets/js/theme/common, find the function updateView(data, content = null)
Find where it says if (data.price instanceof Object) {, and right below that add this code:
// Update Spresso HTML markers
const productId = viewModel.$priceWithoutTax.attr('data-spresso-fallback-id');
const currentId = viewModel.$priceWithoutTax.attr('data-spresso-item-id');
const currentType = viewModel.$priceWithoutTax.attr('data-spresso-item-type');
const hasDefaultPricing = viewModel.$priceWithoutTax.attr('data-spresso-default-pricing');

let newId = productId;
let newType = 'product-id';
if (data.sku) {
    newId = data.sku;
    newType = data.base ? 'product-sku' : 'variant-sku';
} else if (data.v3_variant_id) {
    newId = data.v3_variant_id;
    newType = 'variant-id';
}

if (data.instock) {
    viewModel.$priceWithoutTax.attr('data-spresso-oos', null);
} else {
    viewModel.$priceWithoutTax.attr('data-spresso-oos', '');
}

viewModel.$priceWithoutTax.attr('data-spresso-item-id', newId);
viewModel.$priceWithoutTax.attr('data-spresso-item-type', newType);

// Remove the element content if needed so Spresso can replace it
if (hasDefaultPricing == undefined && (newId !== currentId || newType !== currentType)) {
    viewModel.$priceWithoutTax.html('    ');
}
Also in the same file, find the function updatePriceView. Modify the if (price.without_tax) block to:
if (price.without_tax) {
    const updatedPrice = price.price_range
        ? `${price.price_range.min.without_tax.formatted} - ${price.price_range.max.without_tax.formatted}`
        : price.without_tax.formatted;
    viewModel.priceLabel.$span.show();
    // Check if price for this item is managed by BigCommerce
    const hasDefaultPricing = viewModel.$priceWithoutTax.attr('data-spresso-default-pricing');
    if (hasDefaultPricing != undefined) {
      viewModel.$priceWithoutTax.html(updatedPrice);
    }
}
The image below shows the entirety of the changes to this file, lines in green have been added or edited and lines in red have been removed.
5. Make sure the Spresso price is added to cart, not the BigCommerce price:
Everywhere in your code where you see utils.api.cart.itemAdd, simply find-and-replace that with window.Spresso.stencilAddItem which is a function created by the Spresso SDK that ensures the correct price ends up in the cart.
6. Update direct add-to-cart from Gallery, if applicable:
Find all locations on your site where users can add to cart directly from a Grid/Gallery component. The easiest way to do this is to search for add_to_cart_url in your theme.
To each of those elements, add the Spresso click handler, as shown below:
<a href="{{add_to_cart_url}}" onclick="window.Spresso.stencilAddGridItem(event)" data-event-type="product-click" class="button button--primary" data-product-id="{{id}}">
  {{lang 'products.add_to_cart'}}
</a>
7. Ensure variant changes in the cart page are handled:
Find the Save button in the configure-product.html modal located in templates/components/cart/modals/configure-product.html. Add the Spresso click handler to this button:
<input class="button button--primary" type="submit" value="{{lang 'common.save'}}" onclick="window.Spresso.stencilEditVariant(event, 'CartEditProductFieldsForm')">The second argument must be the id of the form which is being submitted while configuring the product options.
8. Lastly account for any other locations that show pricing:
Some common places where people might show prices are:
- Transactional emails like the order invoice or abandoned cart email.
- Printable order confirmations.
- Pages in the "My Account" section of your website - for security, the Spresso SDK does not run on logged-in pages and the checkout page. If any of these pages show prices on your website, please contact us!
If you show prices in any of these locations, it might end up being different than the price the user sees when you install Spresso. Contact us at [email protected] - for tips and best practices on how to handle these scenarios.
Updated 10 months ago