
Shopify Plus Install Instructions: Liquid
- Introduction
- Understanding Price Optimization
- Implementation Steps with Code Examples
Introduction
This guide is specifically designed for integrating Spresso's AI-driven Pricing Intelligence into a Shopify storefront built with liquid-based themes. While the general integration documentation covers more general setups, this guide addresses the specific concerns that are important in liquid Shopify integrations.
For general integration steps, refer to our General Integration Documentation.
Understanding Price Optimization
Spresso's pricing engine dynamically adjusts product prices to optimize for profit and revenue. it's essential to ensure that these dynamic prices are accurately integrated into your storefront in two points:
- Price Markers - anywhere and everywhere price is displayed on the frontend before cart/checkout
- Add to Cart - as the price value provided during the Add to Cart (ATC) process (including Buy Now, if applicable)
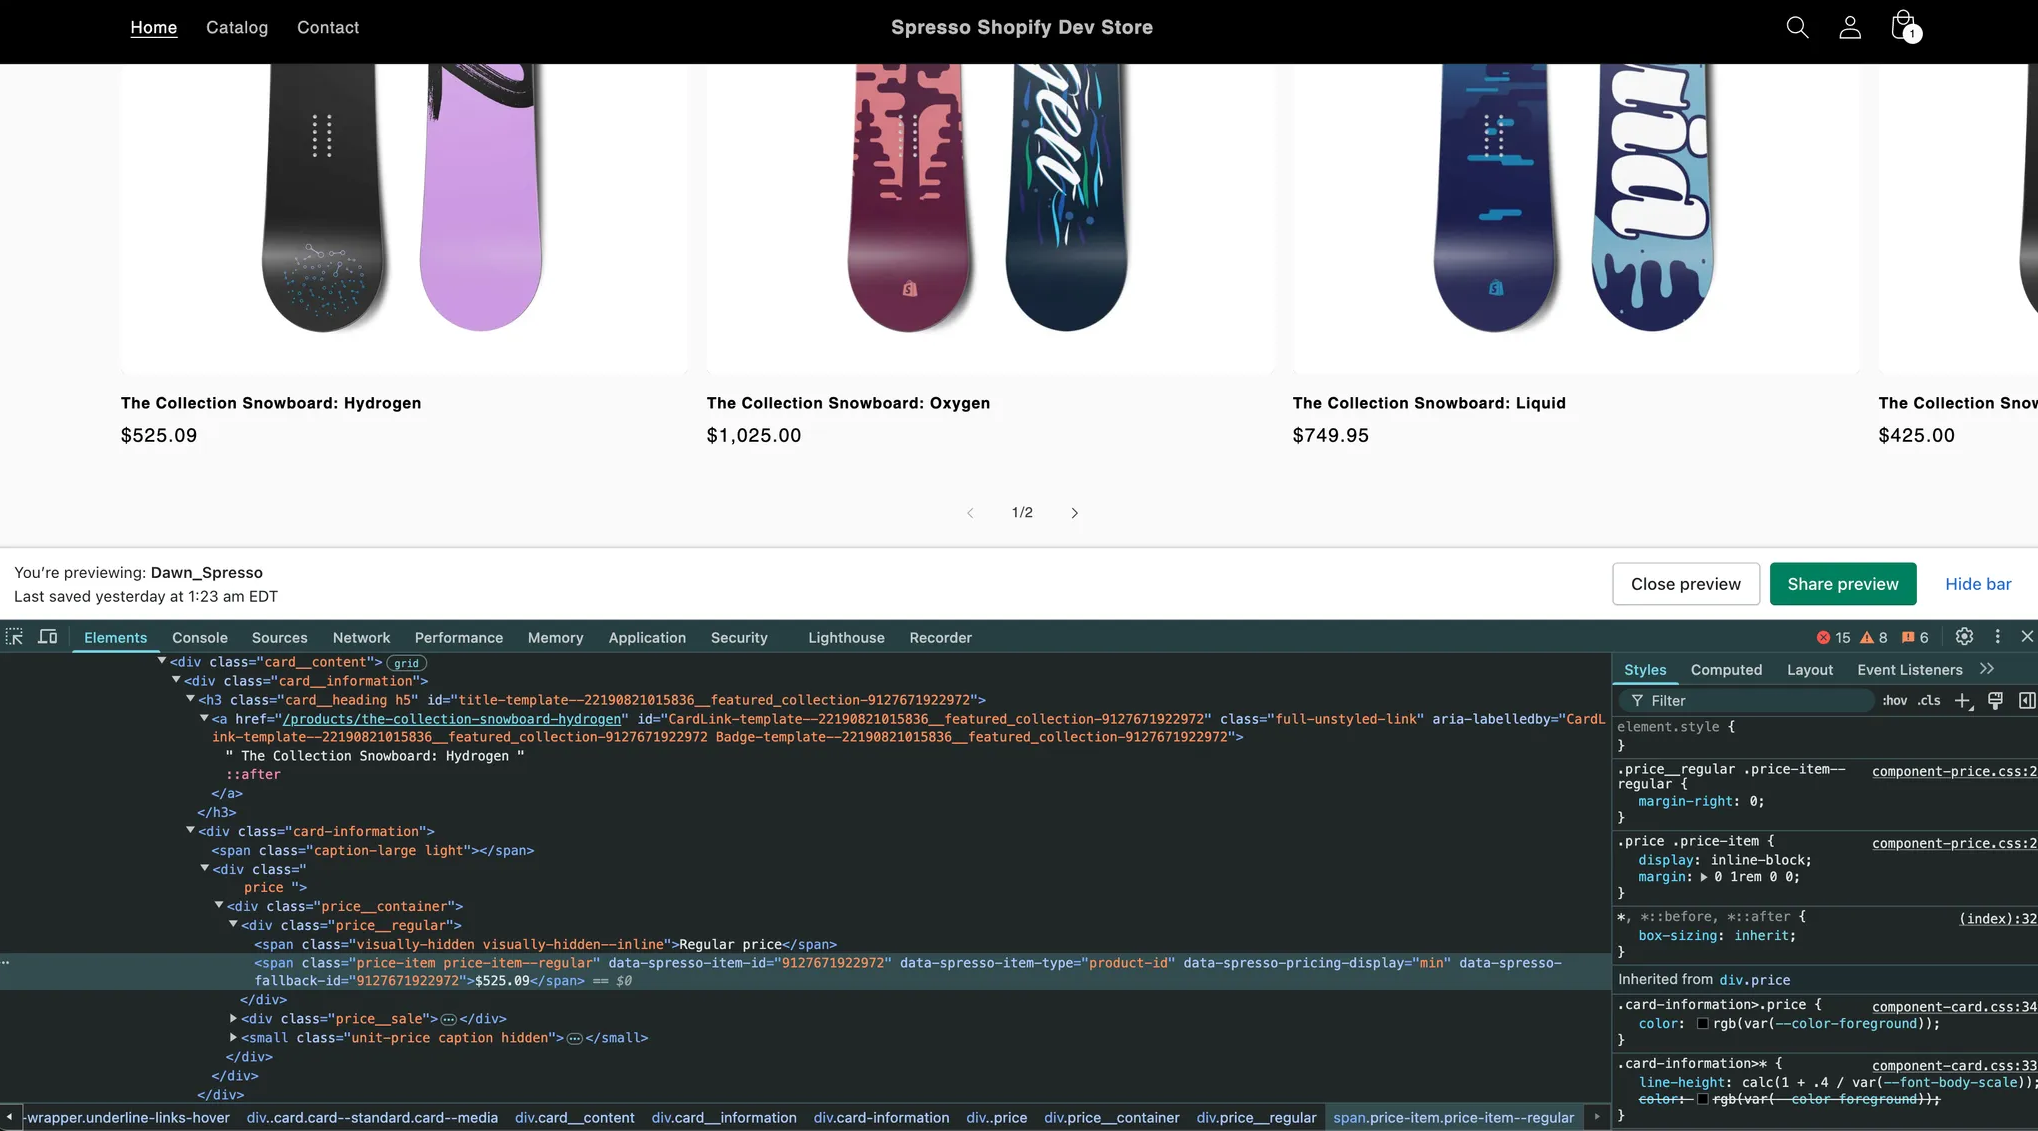
Price Markers
Inspecting a product's price on the browser shows Spresso's data attributes used for rendering optimized prices.
Add to Cart (ATC) Integration
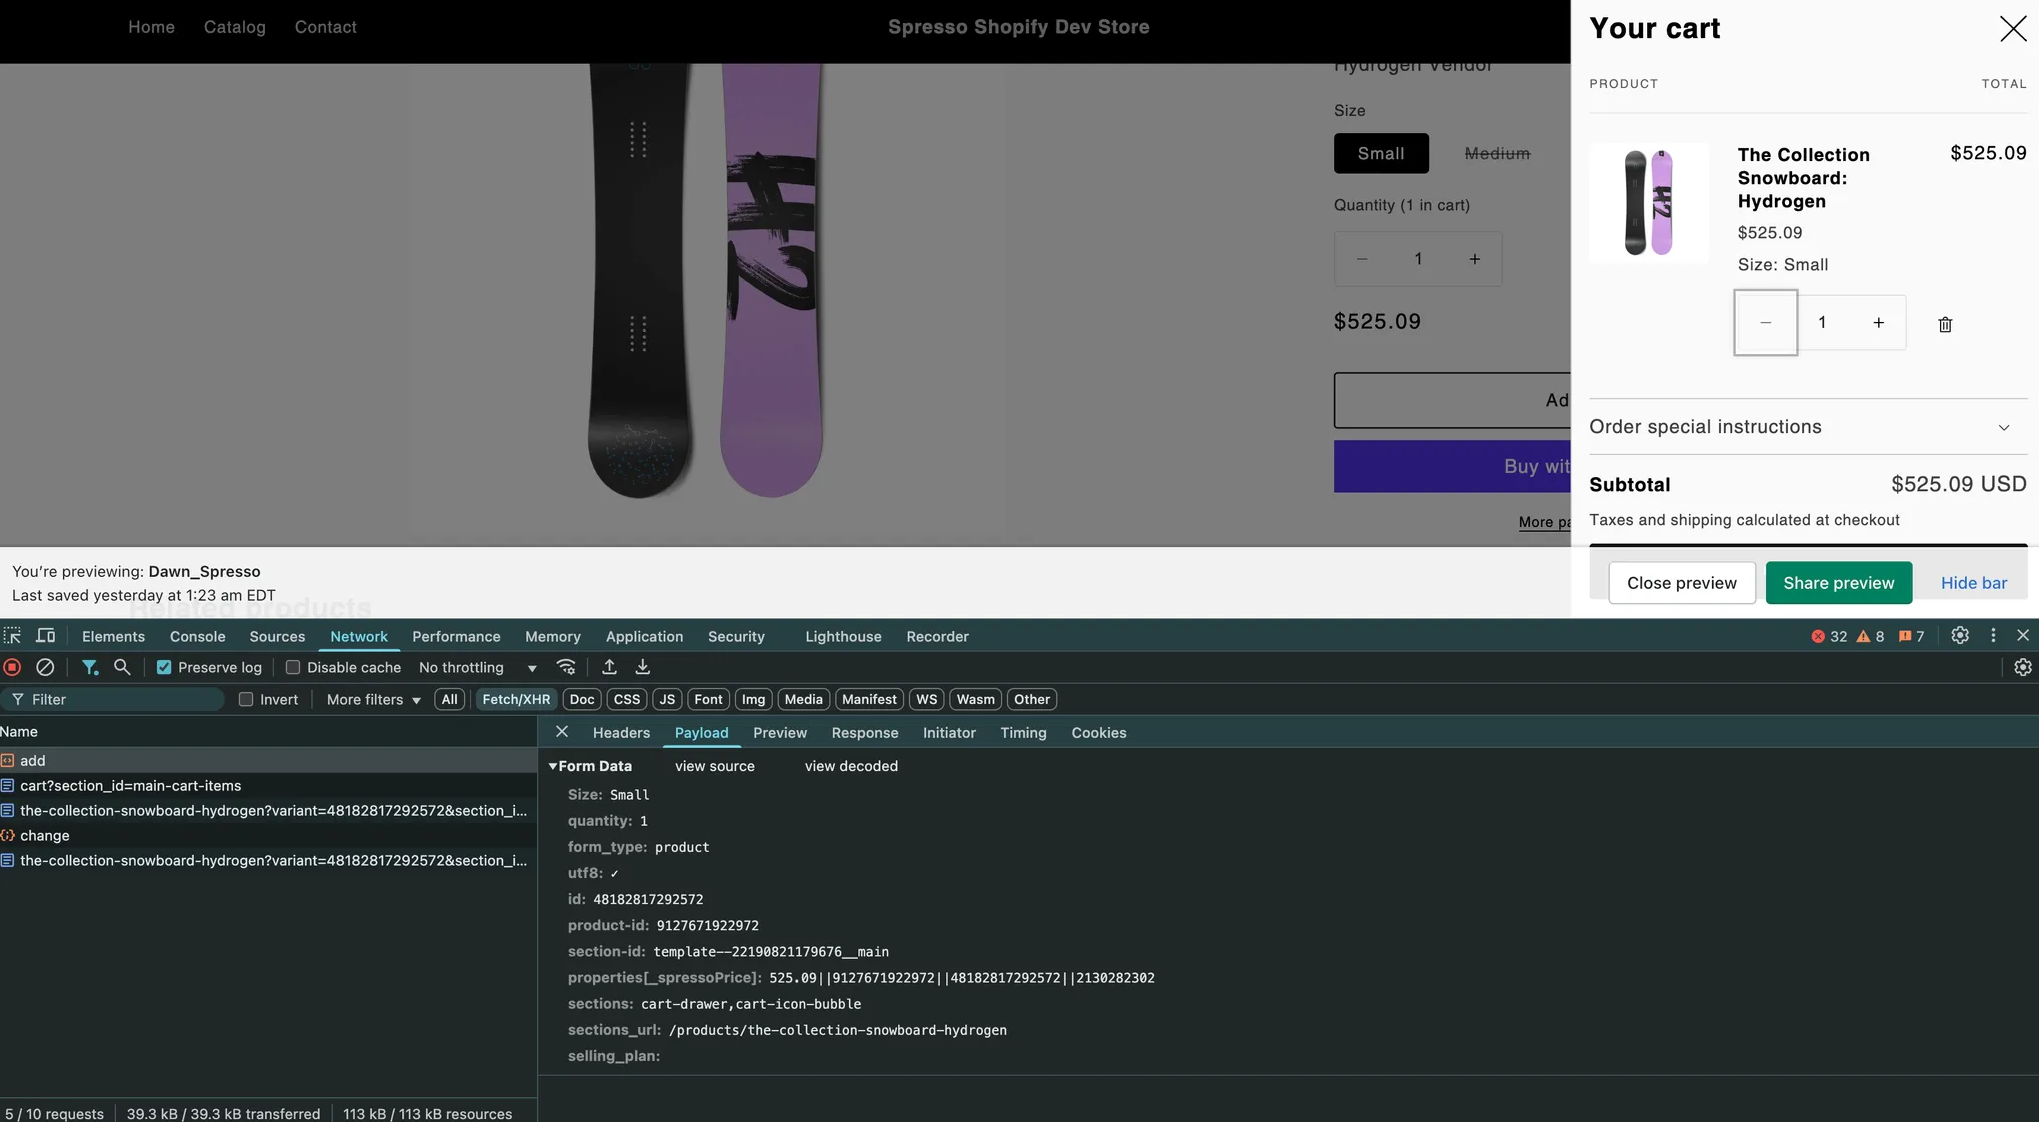
When a customer adds a product to the cart, the ATC network call includes the _spressoPrice attribute. This attribute is utilized by Spresso's Cart Transform extension to ensure the correct price is processed during checkout.
Implementation Steps with Code Examples
1. Integrate Spresso's Web SDK
To enable Spresso's dynamic pricing features, the first step is to incorporate the Spresso Web SDK into your theme.
Adding Spresso script tag to<head>, usually in theme.liquid:
<head>
...
<script
defer
src="https://api.spresso.com/sdk/latest/shopify-sdk.js?id=<ORG ID HERE>&vendorStoreName=<MYSHOPIFY.COM URL>&vendorApiKey=<SHOPIFY ACCESS TOKEN HERE>&country={{localization.country.iso_code}}¤cy=<STORE BASE CURRENCY>&cartCurrency={{cart.currency.iso_code}}"
></script>
...
</head>Replace the placeholders with your store's specific details. You can easily copy and paste the script tag from Spresso's admin console on the Developer Tools page
- (org) id, vendorApiKey -- Found in Spresso's admin console on the Developer Tools page
- vendorStoreName -- Your store's myshopify.com URL -- e.g.
my-store.myshopify.com - currency -- Your store's base currency using 3 character ISO code (e.g.
USD) - country -- not a placeholder, leave this dynamic liquid value exactly as shown in code example -- e.g.
country={{localization.country.iso_code}} - cartCurrency -- not a placeholder, leave this dynamic liquid value exactly as shown in code example -- e.g.
cartCurrency={{cart.currency.iso_code}}
2. Add 'use_spresso' toggle (optional, but highly recommended)
Here we cover how to add code to your theme in order to control toggling Spresso code. We cover:
- Adding the
use_spressotheme setting - Using
localization.country.iso_codeto restrict to target country - Adding
window.useSpressofor use in Javascript
2a. Adding use_spresso theme setting for use in Liquid code
use_spresso theme setting for use in Liquid codeWe recommend adding use_spresso to your theme settings to easily separate rendering done with and without Spresso.
- In
settings_schema.jsonfile, add:
...other settings...
{
  "name": "Spresso",
  "settings": [
    { "type": "checkbox", "id": "use_spresso", "label": "Use Spresso", "default": true }
  ]
}
- Now we can use
ifstatements withuse_spressoto wrap Spresso code in liquid.
{%- if settings.use_spresso -%}
  <span>Spresso is currently on!</span>
{%- else -%}
  <span>Spresso is currently off!</span>
{%- endif -%}
2b. Restricting Spresso to target country using localization.country.iso_code
localization.country.iso_codeIn order to make sure that Spresso doesn't affect pricing outside your target country, we should use localization.country.iso_code to accomplish this.
- For liquid code, we have to check
use_spressoalong withlocalization.country.iso_code:
{%- if settings.use_spresso and localization.country.iso_code == 'US'  -%}
  <span>Spresso is currently on!</span>
{%- else -%}
  <span>Spresso is currently off!</span>
{%- endif -%}
2c. Adding window.useSpresso for use in Javascript code
window.useSpresso for use in Javascript codeIt is also recommended to make the use_spresso setting and localization.country.iso_code available as a boolean available to the JavaScript context for runtime use. Here we create a variable window.useSpresso for this purpose. Above the SDK script tag you can add this:
<head>
...
<!-- ADD BELOW -->
<script>
window.useSpresso = {% if localization.country.iso_code == 'US' and settings.use_spresso %}true{% else %}false{% endif %}; // Replace 'US' if targeting another country
</script>
<!-- END ADD -->
<script
defer
src="https://api.spresso.com/sdk/latest/shopify-sdk.js?id=<ORG ID HERE>&vendorStoreName=<MYSHOPIFY.COM URL>&vendorApiKey=<SHOPIFY ACCESS TOKEN HERE>&country={{localization.country.iso_code}}¤cy=<STORE BASE CURRENCY>&cartCurrency={{cart.currency.iso_code}}"
></script>
...
</head>- With this, you can now wrap Spresso code with
ifstatements in Javascript:
const someFunction = () => {
  if (window.useSpresso) {
    console.log('Spresso is currently on!');
  } else {
    console.log('Spresso is currently off!');
  }
}
3. Add Spresso Attribute Markers for Price Rendering
For any individual Spresso price display, a choice must be made: base it on a product family or a single variant? Read on for context-appropriate guidance on picking the right one.
General/Gallery Price Rendering
Typically, products (as opposed to variants) are used for rendering prices in areas such as Homepage, Category, and Search listings. This makes it possible to show a card with a range of prices / colors / other options, the lowest price, etc... as appropriate for your product assortment. With Spresso we therefore recommend using productIds for these type of pricing displays unless you absolutely need to use variants.
- Before Spresso changes, the rendering of such a price might look like:
<span class="price-item price-item--regular">
  {{ product.price | money  }}
</span>- After adding Spresso Markers, the code looks like this:
{%- if settings.use_spresso and localization.country.iso_code == 'US' -%}
<span class="price-item price-item--regular"
data-spresso-item-id="{{ product.id }}"
data-spresso-item-type="product-id"
data-spresso-pricing-display="min"
{% if product.available != true %}data-spresso-oos{% endif %}
>
</span>
{%- else -%}
<span class="price-item price-item--regular">
{{ product.price | money }}
</span>
{%- endif -%}You'll note that the else clause is exactly the original rendering, with no changes.
We specify that the pricing is at the product level by providing a product id as well as by specifying that the data-spresso-item-type is product-id.
Further notes on the Spresso Markers:
data-spresso-pricing-display-- For a product family, this governs the price shown. It should be one of the following valid values:min-- Renders the lowest [product]variant's price.minis the default. (e.g. $20)max-- Renders the highest [product]variant's price (e.g. "$60")range-- Renders the lowest to highest [product]variant's price (e.g. "$20 - $60":)
Product Details Page (PDP) Price Rendering
For the PDP, variants are generally used for rendering prices.
Important: two additional attributes are required for PDP:
data-spresso-price-context="pdp"data-spresso-oos
Here's an example where Spresso Markers have been added for a PDP price:
{%- if settings.use_spresso and localization.country.iso_code == 'US' -%}
<span class="price-item price-item--regular"
data-spresso-item-id="{{ variant.id }}"
data-spresso-item-type="variant-id"
data-spresso-price-context="pdp"
{% if variant.available != true %}data-spresso-oos{% endif %}
>
</span>
{%- else -%}
<span class="price-item price-item--regular">
{{ variant.price | money }}
</span>
{%- endif -%}Notes on the Spresso Markers:
data-spresso-price-context-- should bepdpif this price is being rendered on the PDPdata-spresso-oos: This should be added if (and only if) the item is unavailable. Note that this attribute is added alone with no value.
Rendering Prices for Product OR Variant
There may be situations where the liquid code is used to render prices by variant OR product based on the context.
If this does not apply to your theme, feel free to skip, otherwise read on...
- The code might look something like:
{%- liquid
  if use_variant
    assign target = product.selected_or_first_available_variant
  else
    assign target = product

  assign target_price = target.price
-%}
....
....later in the code...
....
<span class="price-item price-item--regular">
  {{ target_price | money }}
</span>- To handle such situations with Spresso Markers, we add some additional liquid code to facilitate setting appropriate values for
data-spresso-item-idanddata-spresso-item-typeas shown below:
{%- liquid
if use_variant
assign target = product.selected_or_first_available_variant
else
assign target = product
assign target_price = target.price
# SPRESSO CODE
assign spresso_item_id = target.id
if use_variant
assign spresso_item_type = 'variant-id'
else
assign spresso_item_type = 'product-id'
endif
-%}
....
....later in the code...
....
{%- if settings.use_spresso and localization.country.iso_code == 'US' -%}
<span class="price-item price-item--regular"
data-spresso-item-id="{{ spresso_item_id }}"
data-spresso-item-type"{{ spresso_item_type }}"
{% if spresso_context == 'pdp' %}data-spresso-price-context="pdp"{% endif %}
{% if target.available != true %}data-spresso-oos{% endif %}
>
</span>
{%- else -%}
<span class="price-item price-item--regular">
{{ target_price | money }}
</span>
{%- endif -%}Note on spresso_context = 'pdp'
In this example, spresso_context was passed as a parameter to this liquid file. Say this file is named price.liquid. It might be rendered for the PDP like so:
{%- render 'price',
  product: product,
  use_variant: true,
  spresso_context: 'pdp' <-- Do not pass this if not rendering price for the PDP
-%}
Handle Dynamic Switching Between Variant/Product Options (JavaScript)
This section mostly applies to PDPs where a customer can switch between variants (e.g. selecting colors or sizes of a t-shirt). If you are using JavaScript to update the rendered price when switching, you must update your JavaScript code to be Spresso aware.
- JavaScript code that updates pricing might look something like this:
_onVariantChanged(event) {
  const variant = event.detail.variant;
  const price = variant.price;

  const regularPriceEl = this.querySelector('.price-item--regular');
  regularPrice.innerHTML = formatMoney(price);
};- You can update the code to instead update the Spresso attributes of the element containing the price:
_onVariantChanged(event) {
  const variant = event.detail.variant;
  const price = variant.price;

  const regularPriceEl = this.querySelector('.price-item--regular');
  regularPriceEl.innerHTML = formatMoney(price);

  if (window.useSpresso) {
    regularPriceEl.innerHTML = ' ';
    regularPriceEl.setAttribute('data-spresso-item-id', variant.id);
    if (variant.available) {
      regularPriceEl.removeAttribute('data-spresso-oos');
    } else {
      regularPriceEl.setAttribute('data-spresso-oos', '');
    }
  } else {
    regularPriceEl.innerHTML = formatMoney(price);
  }
};
In this example, instead of setting the element's innerHTML to the formatted price, we update the variantId on the Spresso attributes and clear the innerHTML (using ) so that the Spresso can pull the price for this variant.
Rendering Sale Badges
Spresso enables the display of dynamic sale badges such as $ Off and Percentage Off. These badges are rendered by using the data-spresso-transform attribute, which applies real-time calculations based on the product's price and compare-at-price.
- Please refer to our public documentation for full list of available transform operators
An example of displaying savings or discount percentages:
{%- if settings.use_spresso and localization.country.iso_code == 'US' -%}
<span class="price-item price-item--regular strikethrough">
{{ variant.compare_at_price }}
</span>
<span class="price-item price-item--sale"
data-spresso-item-id="{{ variant.id }}"
data-spresso-item-type="variant-id"
data-spresso-price-context="pdp"
{% if variant.available != true %}data-spresso-oos{% endif %}
>
</span>
// PERCENT OFF USING SPRESSO TRANSFORM
<span class="price-item price-item--percentoff"
data-spresso-item-id="{{ variant.id }}"
data-spresso-item-type="variant-id"
data-spresso-transform="price | times: -10000 | divided_by: {{ variant.compare_at_price}} | plus: 100 | prefix: (| suffix: % OFF)"
>
</span>
{%- else -%}
<span class="price-item price-item--regular strikethrough">
{{ variant.compare_at_price }}
</span>
<span class="price-item price-item--sale">
{{ variant.price | money }}
</span>
<span class="price-item price-item--percentoff">
({{ variant.price | divided_by: variant.compare_at_price | times: -100 | plus: 100 | round }}% OFF)
</span>
{%- endif -%}In this example, we give the rendering span a data-spresso-transform value that mimics how the % OFF is normally rendered. Note that the returned price in Spresso is in dollars (e.g. 123.99), while the Shopify price is in cents (e.g. 12399). That is why the data-spresso-transform requires times: -10000 value while the Shopify transform uses times: -100.
Handling Compare-At Prices
Typically compare-at prices are the normal price of the item, and when on sale the item has a lower price than the compare-at price. No changes are needed for compare-at price because Spresso does not modify them.
4. Add Spresso properties for Add To Cart
When a user adds a product to their cart, it’s essential to provide the Spresso-Optimized Price(_spressoPrice). This ensures pricing accuracy downstream in both cart and checkout. There are several flavors of Add to Cart (ATC) code, so we’ll give examples on how to handle some of them.
add.js — using FormData (Dawn Theme default code)
The code for this flavor looks something like this:
onSubmitHandler(evt) {
	...
  const config = fetchConfig('javascript');
  config.headers['X-Requested-With'] = 'XMLHttpRequest';
  delete config.headers['Content-Type'];

  const formData = new FormData(this.form);
  ...
  config.body = formData;

  fetch(`${routes.cart_add_url}`, config) // This is the ATC Request
	  .then((response) => response.json())
    .then((response) => {
  ...
}
Spresso provides a helper method handleAddToCart() to inject the _spressoPrice attribute into the FormData object. We can make the following changes so that the _spressoPrice is properly supplied:
async onSubmitHandler(evt) { // Make sure to make this async so we can use await
	...
  const config = fetchConfig('javascript');
  config.headers['X-Requested-With'] = 'XMLHttpRequest';
  delete config.headers['Content-Type'];

  const formData = new FormData(this.form);
  ...
  // SPRESSO CODE START
  if (window.useSpresso) {
    try {
      await window.Spresso.handleAddToCart({ formData }); // this will add properties[_spressoPrice] to the formData
    } catch (ignored) {}
  }
  // SPRESSO CODE END

  config.body = formData;

  fetch(`${routes.cart_add_url}`, config)
	  .then((response) => response.json())
    .then((response) => {
  ...
}
add.js — using a JSON object
The code for this flavor looks something like this:
newForm.addEventListener('submit', async (e) => {
  e.preventDefault();
  animatedBtn();
  let data = {};
  const id = newForm.querySelector('.product-single__variants').value;
  const quantity = newForm.querySelector('#Quantity-{{ product.id }}').value;
	...
	...

  const addData = await getVariantsToAdd(data, { id: parseInt(id), quantity: parseInt(quantity) });

  fetch('/cart/add.js', {
    method: 'POST',
    headers: {
      'Content-Type': 'application/json',
    },
    body: JSON.stringify(addData),
  })
    .then((response) => response.json())
  ...
  ...
});
You can use the Spresso method getSpressoPrice and then place the results in the lineItem's properties object. We can make these changes to add the _spressoPrice:
newForm.addEventListener('submit', async (e) => {
  e.preventDefault();
  animatedBtn();
  let data = {};
  const id = newForm.querySelector('.product-single__variants').value;
  const quantity = newForm.querySelector('#Quantity-{{ product.id }}').value;
  ...
  ...

  const addData = await getVariantsToAdd(data, { id: parseInt(id), quantity: parseInt(quantity) });

  // SPRESSO CODE START
  if (window.useSpresso) {
    try {
      const spressoPrice = await window.Spresso.getSpressoPrice(id, "variant-id");
      if (spressoPrice) {
        formData.items[0].properties = { // put the _spressoPrice on the lineItem.properties
          '_spressoPrice': spressoPrice
        }
      }
    } catch (ignored) {}
  }
  // SPRESSO CODE END

  fetch('/cart/add.js', {
    method: 'POST',
    headers: {
      'Content-Type': 'application/json',
    },
    body: JSON.stringify(addData),
  })
    .then((response) => response.json())
  ...
  ...
});
graphql.json — mutation CartLineAdd
The JavaScript for this flavor looks something like:
const handleAddToCart = useCallback(async () => {
    if (!selectedVariant?.id || isAdding || cartIsUpdating) return;
    setIsAdding(true);

    const newAttributes = (
      attributes && attributes.length ? attributes : []
    ) as AttributeInput[];

    linesAdd([ // This is just a function that makes the graphQL call
      {
        attributes: newAttributes, // no actual attributes are added in this example
        merchandiseId: selectedVariant.id,
        quantity,
        sellingPlanId,
      },
    ]);
    ...
    ...
}
Spresso provides a helper method addSpressoCartAttributes() to inject the _spressoPrice attribute into the line item metadata. We can make these changes to add the _spressoPrice:
const handleAddToCart = useCallback(async () => {
    if (!selectedVariant?.id || isAdding || cartIsUpdating) return;
    setIsAdding(true);

    const newAttributes = (
      attributes && attributes.length ? attributes : []
    ) as AttributeInput[];

    // SPRESSO CODE START
   if (window.useSpresso) {
     const legacyVariantId = parseGid(selectedVariant?.id)?.id; // a legacyId looks like "40466870534313", non-legacy looks like "gid::/shopify/ProductVariant/40466870534313"
     if (legacyVariantId) {
       try {
         await window.Spresso.addSpressoCartAttributes(legacyVariantId, newAttributes); // This will add an attribute with key: '_spressoPrice' and value: [the spressoPrice]
       } catch (ignored) {}
     }
   }
   // SPRESSO CODE END

   linesAdd([
     {
        attributes: newAttributes,
        merchandiseId: selectedVariant.id,
        quantity,
        sellingPlanId,
     },
   ]);
   ...
   ...
}
Updated 10 months ago